[01-Apr-2025 21:50:27 Australia/Sydney] PHP Fatal error: Uncaught Error: Undefined constant "ABSPATH" in /home/saracrav/public_html/blog.saracrave.com.au/wp-content/plugins/thrive-visual-editor/thrive-dashboard/inc/app-notification/classes/DbMigration.php:2 Stack trace: #0 {main} thrown in /home/saracrav/public_html/blog.saracrave.com.au/wp-content/plugins/thrive-visual-editor/thrive-dashboard/inc/app-notification/classes/DbMigration.php on line 2 Ana Maria, Author at Sara Crave Blog - Page 5 of 6
Ana Maria

Author Archives: Ana Maria

Banana Muffins Recipe

banana muffins

Banana muffins treat;

My best banana muffins recipe is so easy, you have to try it!

In my home we have bananas all the time as part of our diet and for all the benefits they have, so cooking up a batch of banana muffins just seems natural.

Let’s begin by looking at the banana’s benefits; To mention few of them, the potassium we can get eating a banana every day, another attribute is the soluble fiber to support the digestive system, and other great benefits are the vitamins B6 and C we obtain from this great fruit, without mentioning the amount of energy for our body eating bananas.

Bananas are available during all seasons, because they don’t have specific time of the year to grow, therefore we can rely on them to cook any recipe.

Before I share my Banana Muffins recipe with you, I would like to tell a little bit more about why I like them. I enjoy having a cup of coffee every afternoon when I am reading as a hobby, although coffee by itself it is not as good as with something to eat. So I cook a healthy snack to have my cuppa with, without any worry to gain weight and at the same time satisfy my sugar craving.

Let’s share with you an easy Banana Muffins recipe. This recipe is healthy and easy to cook, even Banana Muffins are a great option for kids take to school.

This Banana Muffins recipe is to prepare six muffins.

Muffins Ingredients;

  • 1 Cup of gluten free flour
  • 1/2 Cup of walnuts
  • 1/4 Cup of vanilla or banana protein powder
  • 1 & 1/2 Table spoons of honey
  • 1/4 Cup of coconut oil
  • 1/2 Tablespoon of baking powder
  • 2 Ripe Bananas 
  • 1 Egg
  • Pinch of salt
  • Now we have all the ingredients ready to prepare Banana Muffins!

    Turn the oven on to preheat at 170 centigrade, while we are mixing all the ingredients.

    Get a plate and smash both bananas with a folk until they are completely creamy.

    In the main mixing bowl, blend with a whisk the gluten free flour, protein powder, baking powder, salt and crash walnuts until all of them are entirely mixed.

    The bowl where you smash bananas add the coconut oil, then the honey and keep stirring. And last add the egg and mix all the ingredients to combine them completely.

    banana muffins

    Now, we put the combination of the smashed bananas with the other ingredients into the dry mixture, and mix both mixtures with the whisk until we have blended them completely. I use a spatula to not waste any mixture.

    We have the mixture done to fill the liners up, distribute the liners in a muffin tin, then with a help of two spoons place the mixture inside of the six liners.

    The oven has been heating from the start of preparation of our banana muffins mixture, therefore we are ready to place the muffin tin into the oven for around 15 mins.

    When the 15 mins are over, we insert a knife in one of the banana muffins to be sure they have cooked well. It should come out dry.

    That’s it. How easy was that!

    Eat a Banana Muffin with your favourite hot drink. Put your feet up, get a book as your company and enjoy them!

    I had fun making these muffins; Watch me throw the recipe together below, and let me know in the comments if you enjoy them too, or even if they make you laugh too:)

    If you're looking for some healthy options for main meals as well, give these 31 easy clean eating recipes a try.

50 Beginner Yoga Poses, With Benefits

beginner-yoga-poses-50

Beginner Yoga Poses And Their Benefits;

I was looking for some easy beginner yoga poses for myself, and I really couldn't find a good collection to choose from without bouncing around between different sites.  So I thought I'd take it on myself, and share with you.

I hope it's helpful:)

Yoga itself is an ancient practice originating in India which involves the mind, the body, and the spirit coming together.

As a whole, there are many benefits to practicing yoga, but each pose has its own set of benefits.

Click to Tweet

it's important to know which poses have which benefits so you are using the ones that will most benefit you in the moment.

If you are stressed, you may want something to stretch and calm the muscles of your back and shoulders or just something that focuses more on breathing.

If you are trying to focus on flexibility or weight loss, there are poses for those as well.

These are 50 beginner poses, as well as their benefits, so you can create and follow a sequence that best matches your goals.

50 BEGINNER YOGA POSES

Conquer Breath - Ujjayai Pranayama

beginner yoga poses - ujjayi-pranayama

If you are having difficulty quieting your thoughts due to stress or anxiety, this is the perfect pose for you.

While focusing on your breath, be sure not to tighten your throat. Stay relaxed at all times. You will notice as you become a conqueror of Conquer Breath that you can slow your breath for longer periods of time and that you will become more and more relaxed during your time in this pose.

Easy Pose - Sukhasana

beginner-yoga-poses-sukhasana

You'll have to be careful with this pose if you have a knee injury but there are three main benefits to doing it if you are able to.

  1. It strengthens the back because you are sitting tall and using those muscles to do that.
  2. Because of the way you are sitting, and because of the support of the blanket or folded up towels you are sitting on, it stretches the knees and ankles which is good for people who may have stiffness not related to an injury; And
  3. Of course, because of the mindfulness it is great for calming the brain and allowing you to center yourself.

Staff Pose - Dandasana

beginner yoga poses - dandasana

Because you will be placing your hands flat on the floor while sitting upright, either modify the pose for any wrist or hand discomfort or look to another pose that has similar benefits.

This pose is all about upper body. You will see improved posture with regular practice of this pose as it strengthens the back muscles to help you stand tall again.

Also, any weakened shoulder and chest muscles from poor posture over the years will be stretched so standing or sitting upright is no long uncomfortable for you.

For a more detailed description, including an easy to follow video with instructions on how to perform staff pose, click here.

Cat Pose - Marjaryasana

marjaryasana yoga pose
beginner-yoga-poses-marjaryasana

If you have a neck injury, be sure to keep your head in line with the torso but this pose should be no problem for you and you can reap all the great benefits from it.

First, this pose gently stretches the back, neck, and torso. This is a great one for building up some toned core muscles over time. Also, as you do the stretch, you are actually massaging your spine as well as the organs in your belly so they can get a healthy workout as well.

Sphinx Pose

beginner-yoga-poses-sphinx-pose

If you have a headache or a back injury, this pose is not recommended. However, there are a lot of other beginner yoga poses on this list that will help with both of those so don't be discouraged.

When you first do this pose, it is quite obvious that it stretches the chest and lungs, also the shoulders, as well as the abdomen.

However, it has many other benefits as well;

  1. It strengths the spine, which can help with posture.
  2. If you're looking for tighter glutes, this is the pose for you.
  3. It can also stimulate your abdominal organs so they are working better and, you will see stress relief with Sphinx Pose.

Warrior 1 Pose - Virabhadrasana 1

beginner-yoga-poses-virabhadrasana-1

Women with high blood pressure or other heart problems should seek a doctor's counsel before practicing this pose.

For students, if you have shoulder problems keep your raised arms parallel to each other, and if you have neck problems keep your head in a neutral position.

This pose is used quite often to treat Sciatica. It has many benefits all over the body. You will feel a stretch in the chest, shoulders, neck, belly, and groins. It will also strengthen your arms and shoulders, plus the back muscles.

The lower legs, including thighs, calves, and ankles will all get a good stretch as well, and be strengthened over time.

Gate Pose - Parighasana

beginner-yoga-poses-parighasana

If you have a knee injury, kneeling may be hard so you can try kneeling on a folded towel or blanket to modify the pose.

This pose stretches the hamstrings, as well as along the sides of the spine and torso. It also opens the shoulders for better posture, stimulating better breathing, as well as stimulating other abdominal organs.

For a more detailed description and instructions on how to complete this asana, including a video demonstration click here

Extended Side Angle Pose - Utthita Parsvakonasana

sara-crave-utthita-parsvakonasana

If you have a headache, insomnia, or high or low blood pressure, this may not be the pose for you.

There are other poses that can help calm the mind to help with headaches and insomnia, and still others that can help with blood pressure.

This pose can help with many other things, however. It is known to help with menstrual discomfort as well as infertility problems, Sciatica and low backache, constipation, and osteoporosis.

You will be stretching as well as strengthening the legs, knees and ankles in this pose, as well as stretching the groins, waist, spine, lungs and chest, and shoulders.

This pose stimulates organs as well as increases stamina.

Follow along watching this easy how to video with Kerri McCubben demonstrating this beginner yoga pose - click here

Wide Legged Forward Bend - Prasarita Padottanasana

sara-crave-prasarita-padottanasana

If you have problems with your lower back, avoid the full bend and only bend as far forward as it is comfortable for you.

This pose is used to treat headache, mild depression, as well as fatigue.

With this pose, you with stretch and strengthen the inner and back parts of your legs as well as your spine plus you will tone your abdominal organs.

The Wide-Legged Forward Bend relieves mild back ache and calms the brain.

Wide-Angle Seated Forward Bend - Upavistha Konasana

upavistha-konasana

If you have an injury to your lower back, you should sit on a stack of folded towels or on a blanket and keep your upper body upright as much as possible.

This pose is used for three main purposes. It helps extremely well with arthritis and Sciatica, but it also helps to detox the kidneys, which most people are surprised to hear.

This pose stretches the back and insides of the legs, as well as the groins. It stimulates abdominal muscles while strengthening the spine.

The Wide-Angle Seated Forward Bend is great for mindfulness.

To learn more about Upavistha Konasana, including a how to video taking you through the pose click here

Reclining Bound Angle Pose - Supta Baddha Konasana

supta-baddha-konasana
sara-crave-supta-baddha-konasana

Use supports under your thighs to keep your stretch from becoming too intense for you if you have a knee or groin injury.

Quite often, the Reclining Bound Angle Pose is used to help with the symptoms of menopause or menstruation.

This pose helps to stimulate circulation, while also stimulating the organs of the lower abdominal region like the ovaries, bladder, and kidneys.

You will feel more relaxed in your inner thighs, knees, and groin after this stretch and it also helps with stress and mild depression.

Watch Kerri McCubben share how to do this yoga pose in easy steps in this video.

Hero Pose - Virasana

virasana

This pose is not recommended if you have heart problems. If you have headaches, you can do the pose lying on your back.

There are many benefits to the Hero Pose. It stretches the ankles, knees and thighs while strengthening the arches.

If you are pregnant, this pose will help reduce swelling in the legs and feet. It is commonly used to aide symptoms of high blood pressure and asthma.

And it can help with those suffering from the effects of menopause.

Because of the very posture-perfect pose, it may help improve digestion and relieve gas when practiced regularly and at the right times.

Chair Pose - Utkatasa

beginner-yoga-poses-utkatasa

Be careful with this pose if you suffer from any of the following: low blood pressure, headache, or insomnia.

In Chair Pose, you will strengthen your ankles, calves, thighs, and spine while also stretching your chest and shoulders.

You will stimulate your heart and diaphragm as well as many abdominal organs. Many people are surprised to learn that this pose also helps to reduce flat feet.

Mountain Pose - Tadasana

beginner-yoga-poses-tadasana

This pose should not be practiced if you have a headache, low blood pressure, or insomnia.

Just like the Chair Pose, this pose reduces flat feet.

The pose also improves posture as it strengthens the ankles, knees, and thighs. You will see firmer buttocks and abs when practiced regularly.

It is commonly used to relieve the pain associated with Sciatica.

Bharadvaja's Twist - Bharadvajasana 1

beginner-yoga-poses-bharadvajasana-i

This pose is not recommended if you are suffering from insomnia, low or high blood pressure, or if you have a headache, diarrhea, or if you are menstruating.

This pose is especially good for the lower back. It helps in the second trimester of pregnancy to strengthen those lower back muscles, it helps to relieve lower back and Sciatica pain, as well as neck pain.

This pose stretches the hips, shoulders, and spine.

Because of the gentle twist, it massages the abdominal organs which can improve digestion. Carpal Tunnel Syndrome gets a little help with this pose because of hand placement, but be sure not to place your hands anywhere they feel uncomfortable.

This pose is very helpful for reducing stress.

Salutation Seal - Anjali Mudra

yoga-poses-anjali-mudra

This pose is a great beginner's pose because it has some great benefits and is easy to do.

It helps ease your brain into mindfulness, reducing your stress and anxiety.

It also has physical benefits like creating more flexibility and dexterity in your wrists and fingers.

Corpse Pose - Savasana

beginner-yoga-pose-savasana

If you have a back injury, you can raise the knees and place your feet on the floor, making sure they are hip width apart.

If you are pregnant, raise the head and chest on a bolster so that you are not lying flat.

This pose helps in many areas of physical, mental, and spiritual health. It can calm the mind and relieve stress. It can relax your body.

Because of both of those working in tandem, it can reduce insomnia, fatigue, and headache.

It can also help to lower blood pressure.

Standing Forward Bend - Uttanasana

uttanasana

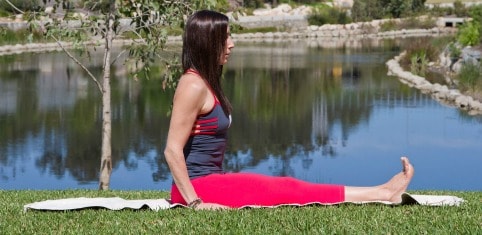
If you have a back injury, you can do this pose with knees bent, or you can perform Ardha Uttanasana, which is a Half Standing Forward Bend.

There are many benefits to this pose and even when practiced by itself, it can give you some of these benefits.

However, when combined with other beginner yoga poses in a sequence, you can have an even greater experience and even more benefits.

Some of these benefits include mindfulness, improved digestion, and relief for insomnia and headache.

It can also help with high blood pressure, asthma, osteoporosis, sinusitis, and infertility.

Over time, it will reduce fatigue, anxiety, and the symptoms of menopause.

Physical results include strengthening of the knees and thighs, stretching of the hips, calves, and hamstrings, and stimulation of the kidneys and liver.

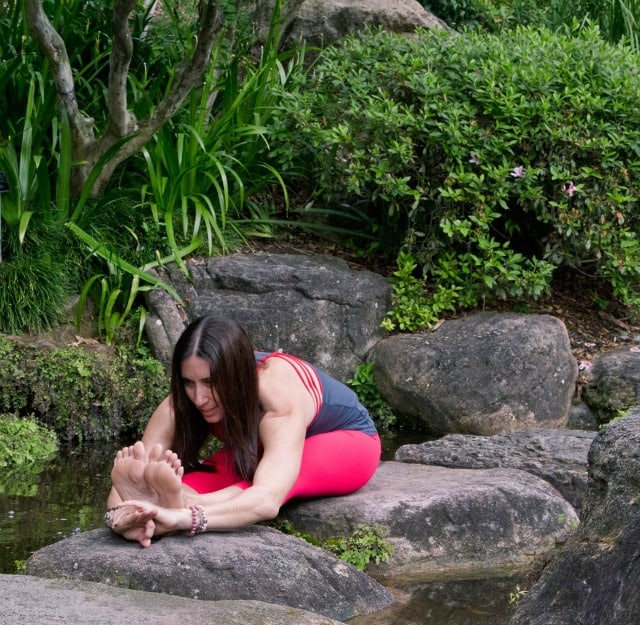
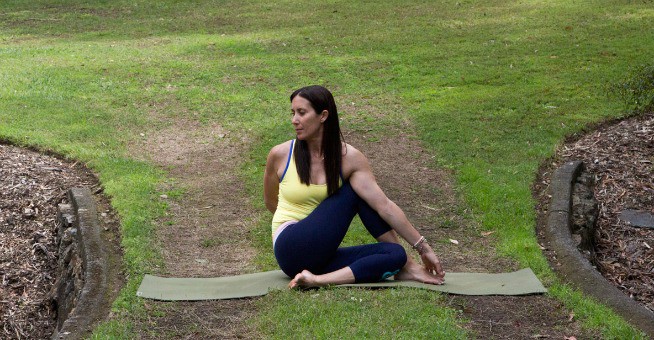
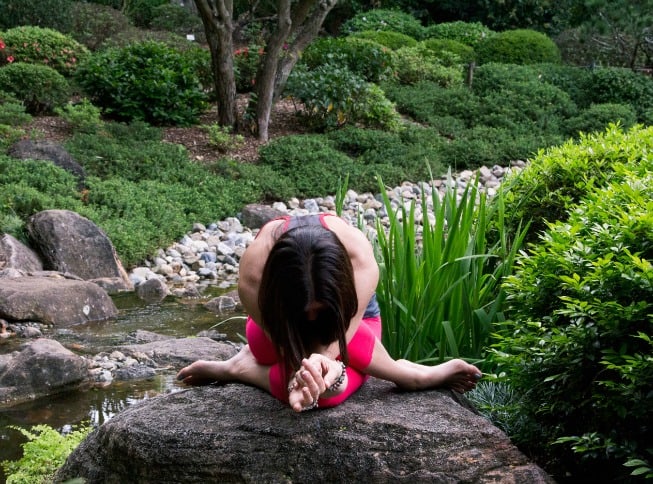
Seated Forward Bend - Paschimottanasana

beginner-yoga-pose-paschimottanasana

This pose is not suitable for those with: asthma, diarrhea, or back injury.

This is another pose with a lot of benefits, especially when practiced regularly.

It can be used to treat high blood pressure, insomnia, infertility, as well as sinusitis, although ancient texts say it also increases appetite, cures diseases, and reduces obesity.

It calms the brain which can help to relieve stress, sometimes leading to less depression if symptoms are mild.

It stimulates the liver and kidneys as well as ovaries and uterus. It can help with the symptoms of menopause as well as the discomfort of menstruation.

Lastly, it can be soothing for headaches and anxiety.

Childs Pose - Balasana

yoga-pose-balasana

During pregnancy, this pose should be avoided. It should also be avoided if you have diarrhea or knee pain/injury.

There are a few benefits of this pose, but those benefits have long-lasting effects and they fit in well with other poses in a sequence to add to the benefits of yoga as a whole.

You will gently stretch your ankles, thighs, and hips.

Also, you may see some relief of neck and back pain when this is done while the torso and head are supported so relaxation can be achieved during breathing, letting tension out of those muscles.

Mindfulness helps to calm the brain, relieving stress and fatigue.

Cobra Pose - Bhujagasana

yoga-pose-bhujagasana

Because you are laying on your stomach for this pose, it should not be practiced during pregnancy.

Also, because of the backward stretch of the back, it shouldn't be done if you have a back injury unless you have been told it is okay by a doctor or physical therapist.

It's not recommended for anyone with Carpal Tunnel Syndrome or a headache.

Even though there are some limitations to this pose, there are many benefits if you are able to do it.

It strengthens the spine and firms the buttocks.

While stretching your lungs and chest, plus your shoulders, you will open your lungs and heart, therefore this pose is sometimes used to help open airways for those with asthma.

Cobra Pose stimulates the organs of the abdomen and relieves fatigue and stress with the way it brings oxygen into the body and stimulates the organs.

Plank Pose

yoga-poses-plank-pose

Planks have gotten some trendy exposure lately as a great fitness regimen, and it is.

However it is a yoga pose and using the mindfulness and breathing techniques as well can make it even more effective not only physically, but also mentally and spiritually.

Because you will be spending time on your hands, it is not recommended for people with Carpal Tunnel Syndrome.

Plank Pose, when done regularly will show you a more tone abdomen and it will help you strengthen your spine, wrists, and arms.

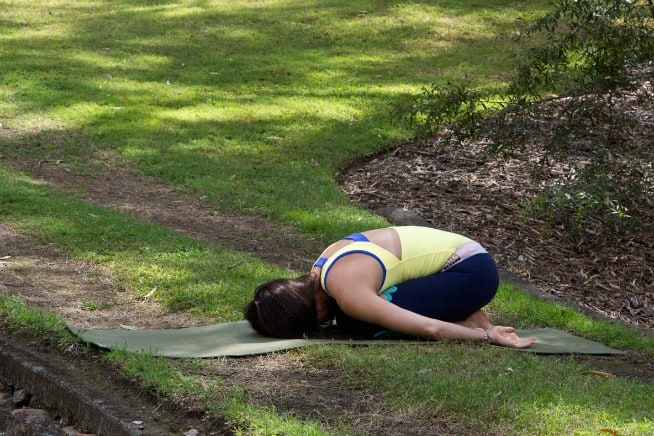
Happy Baby Pose - Ananda Balasana

yoga-pose-ananda-balasana

With the knees brought to your chest the way they are in this pose, it should not be practiced during pregnancy or if you have a knee injury.

If you have a neck injury, place something soft under the head and neck for support.

This pose gently stretches and relaxes the inner groins and the spine.

It helps reduce fatigue as well as stress and anxiety. This is an excellent pose in which to practice deep mindfulness.

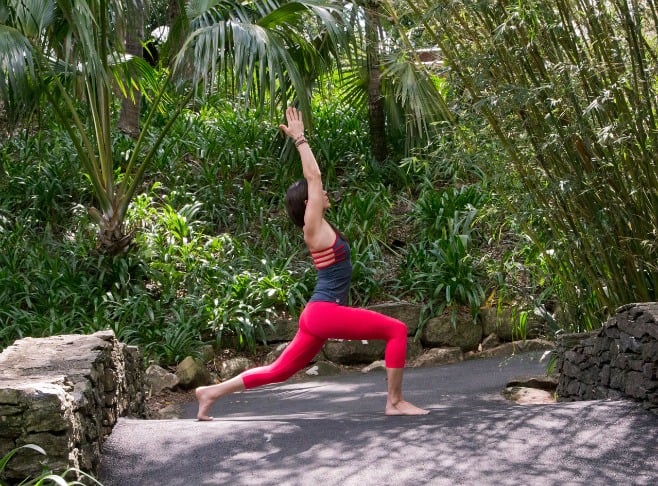
Low Lunge - Anjaneyasana

yoga-poses-anjaneyasana

This is a pose that should not be practiced if you have heart problems, but it is oftentimes used to help those who have Sciatica.

This pose helps to improve balance, both mentally and physically, and works the buttocks, thighs, hamstrings, and more.

You will also stretch and lengthen your hip flexors which is great for those who sit down most of the day at work or school.

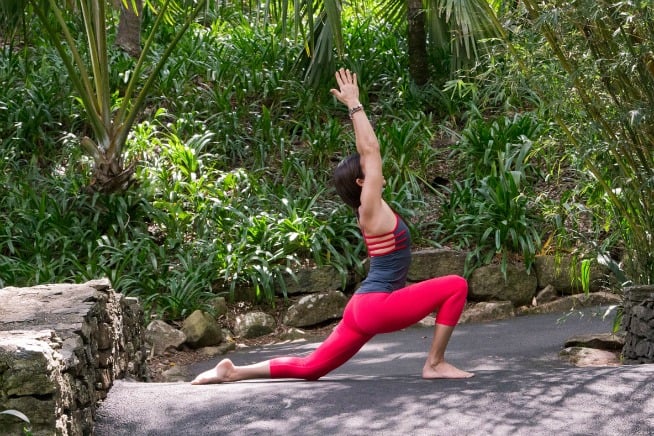
High Lunge - Utthita Ashwa Sanchalanasana

yoga-pose-utthita-ashwa-sanchalanasana

Just like with the Low Lunge, you should not do this one if you have heart problems.

But again, this lunge is used in therapy with Sciatica as it has been shown to improve symptoms.

With this pose, you will also work on your hip flexors.

Both of these lunges can be done easily in a hall (or in your office, if it's big enough) a few times throughout the day to make sure you keep limber and so that you don't end up having hip and back problems later on from a job where you sit much of the time.

Standing Half Forward Bend - Ardha Uttanasana

beginner-yoga-poses-ardha-uttanasana

This pose is safe for pretty much anyone; however, if you have a neck injury, do not lift your head to look forward or to the sides (keep the head in line with the torso and in a neutral position).

This pose stimulates the belly, meaning it can aide in digestion and get other abdominal organs and muscles working.

It stretches the front of the torso and strengthens the back which can lead to improved posture.

Root Bond - Mula Bandha

beginner-yoga-poses-mula-bandha

The root bond – one of three bonds in yogic practice – allows the spine to support the sitting position in a much better way so that when you are in any sitting pose, you can be centered and balanced.

Shown here in downward facing dog (Adho Mukha Svanasana) focus on contracting the muscles at the bottom of the pelvic floor, behind the cervix.

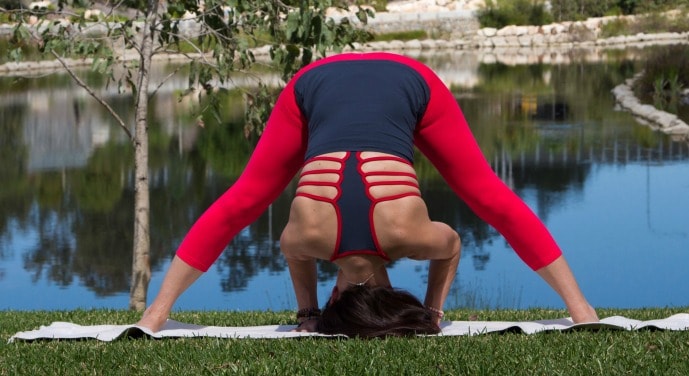
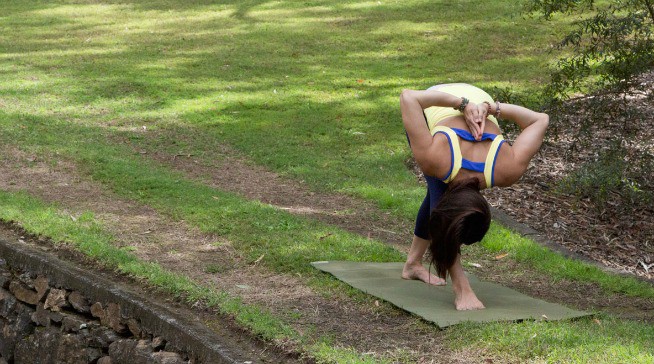
Garland Pose - Malasana

beginner-yoga-poses-malasana

If you have a lower back injury, or injuries to your knees, this pose can be difficult and should not be done if it causes you any discomfort, especially pain.

Besides toning the belly muscles, you will also be stretching the back of the torso, the groins, and the ankles with the Garland Pose.

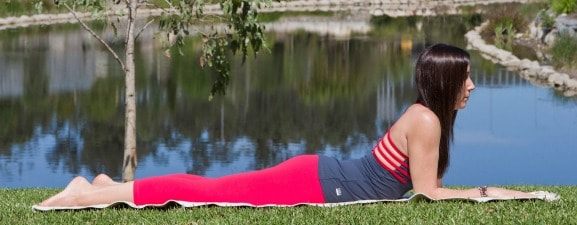
Extended Puppy Pose - Uttana Shishosana

beginner-yoga-poses-uttana-shishosana

Because you are kneeling in this pose, it's not recommended for anyone with a knee injury.

However, if you'd like to try it, you can try kneeling on a prop, folded towel, or thickly folded blanket.

If it causes discomfort, please discontinue.

This pose stretches the shoulders and the spine which can lead to improved posture over time.

Lion Pose - Simhasana

beginner-yoga-poses-simhasana

If kneeling to do this pose, be careful if you have a knee injury.

This pose can also easily be adapted to be practiced in a chair. There are several unique benefits to Simhasana.

According to ancient Indian texts, this pose helps to destroy diseases in the body and helps with the three bandhas, which are Uddiyana, Jalandhara, and Mula.

This pose helps to keep the platysma (a rectangar-shaped muscle that is flat and thin and sits at the front of the throat) firm as we age.

This helps to prevent wrinkles around the mouth, cheeks, and neck. You will also see a release of tension in the face and chest.

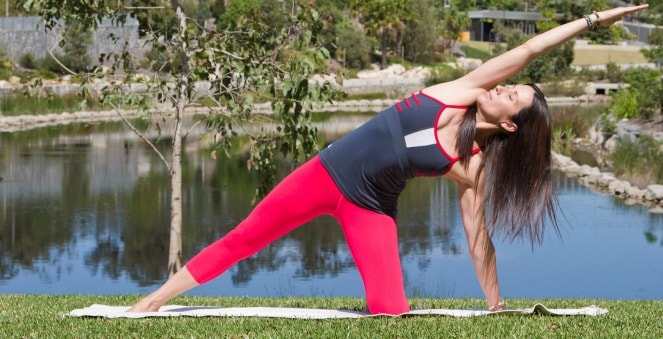
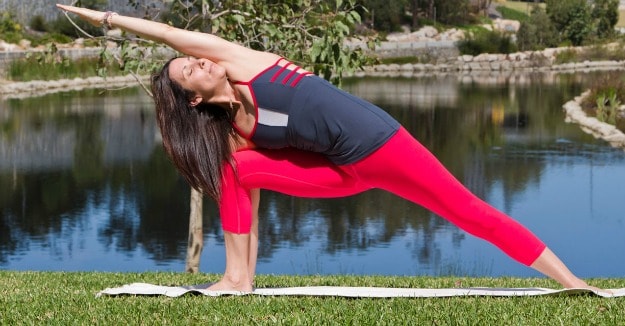
Intense Side Stretch - Parsvottanasana

beginner-yoga-poses-parsvottanasana

With high blood pressure or back pain/injury, instead practice Ardha Parsvottanasana, which is half of this pose.

This pose is often used to treat flat feet and the discomfort associated with it.

The Intense Side Stretch is very good for mindfulness as it calms the brain.

It strengthens the legs while it also stimulates and massages the abdominal organs which can lead to improved digestion.

When done regularly, this pose will improve posture, give you a sense of balance and coordination, and also stretch many areas of the body, including the: hamstrings, hips, wrists, shoulders, and spine.

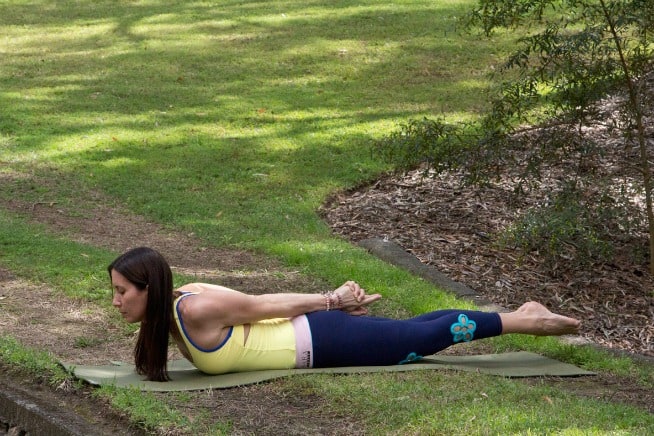
Locust Pose - Salabhasana

beginner-yoga-poses-salabhasana

If you have a headache or a serious back injury, this pose is not recommended.

If you have a neck injury, it is possible to practice this pose (as long as it is comfortable to do so), but the head should remain neutral by looking at the floor instead of straight ahead.

You may find it easier to support your forehead on a prop or a folded towel or blanket.

The Locust Pose has been used to treat lower-back pain and fatigue for quite some time.

It is also used to treat digestion problems such as indigestion, constipation, and flatulence.

When practiced regularly, you can see improved posture because you will be stretching the muscles of the thighs, belly, chest and shoulders, while also strengthening muscles in the legs, arms, buttocks, and spine.

Because of the stretch in the belly, the abdominal organs will be stimulated. This pose also helps to reduce stress.

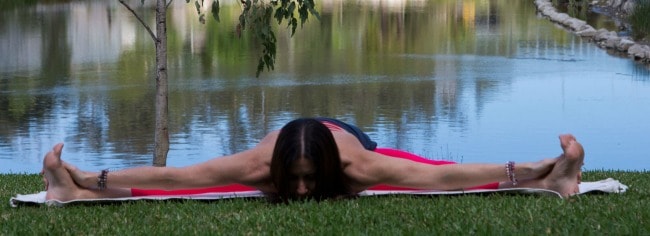
Heron Pose - Krounchasana

beginner-yoga-poses-krounchasana

This pose should not be practiced if you are menstruating.

You can simply replace it with a more appropriate pose that will help with that during that time.

Also, if you have an ankle or knee problem, this pose will be very difficult and may cause more problems so ask a doctor or experienced yoga instructor before practicing this.

The Heron Pose is therapeutically used to treat flatulence and flat feet. It both stimulates the heart and abdominal organs, but it also stretches the hamstrings.

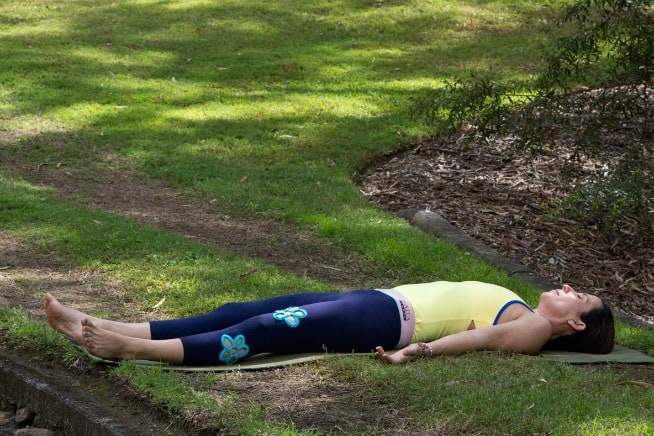
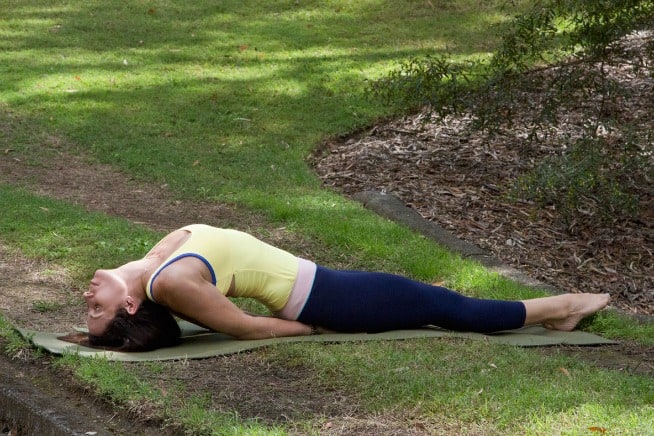
Fish Pose - Matsyasana

yoga-poses-matsyasana

You must be very careful practicing this pose if you have any of the following: low or high blood pressure, insomnia, a migraine, or a serious neck or lower back injury.

Other than basic benefits, which are listed below as well, this pose has many therapeutic uses.

It can help with menstrual pain and mild backache (which may also be a symptom of menstrual pain) or constipation.

It can help with respiratory ailments because it opens up the chest.

It can help with fatigue and anxiety.

The Fish Pose does a lot of stretching in the body, including the deeper hip flexors and the muscles that are between the ribs (which is what helps to open up the chest), the belly as well as the neck, and it strengthens the upper back and back of the neck.

All of this stretching and strengthening can lead to improved posture when practiced regularly.

Some ancient texts say that the Matsyasana is the "destroyer of all diseases."

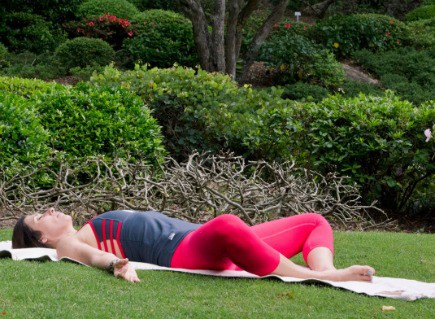
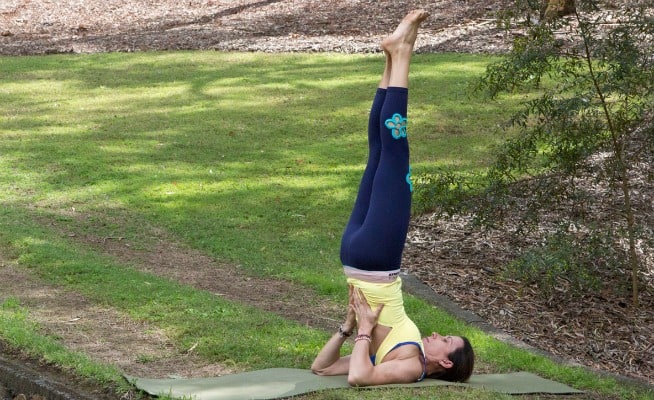
Legs-Up-The-Wall Pose - Viparita Karani

beginner-yoga-poses-viparita-karani

This is an inversion pose and because of that, it should be avoided if you have serious eye problems, such as glaucoma.

As we were doing these poses outdoors, there aren't any handy walls around to rest the legs against, so the pose here is more like a shoulder stand, Salamba Sarvangasana.  You would normally rest your legs against a wall, with your back flatter on the ground.  You could try to find a tree if you're practicing yoga out in nature too, as long as you have flat ground at it's base too.

There are many therapeutic uses with the Viparita Karani.

It can help with menopausal symptoms as well as menstrual cramps and PMS.

It helps with both regular headaches and migraines.

Mentally, it can help with anxiety and mild depression.

It can help relieve digestive problems as well as issues with low and high blood pressure.

Insomnia, respiratory problems, and varicose veins are just a few of the other benefits.

If you stand on your feet for much of the day, this pose will help to relieve cramped feet and legs, rejuvenating them as well as your back.

It also gently stretches the back of the neck, the front of the torso, and back of the legs.

Cow Face Pose - Gomukhasana Twisted

cow face pose

If you have serious shoulder or neck problems consult a doctor or an experienced yoga instructor before practicing this pose.

This pose stretches the chest, the triceps and armpits, the shoulders, the thighs and hips, as well as the ankles.

Overall, this is a great pose for getting a nice stretch.

If you can't reach your fingers behind your back, you can use a strap to do that until your shoulders are limber enough to reach. It could take time so don't push yourself.

Warrior II Pose - Virabhadrasana II

beginner-yoga-poses-virabhadrasana-ii

When you have high blood pressure or are suffering from a bout of diarrhea, this pose should not be practiced.

If you have a neck problem, do not turn your head. Instead, look straight and keep the head neutral.

Other than increased stamina, you will see a stretch in the groins, lungs and chest, as well as shoulders.

This pose strengthens the ankles and legs, as well as stretches them.

Throughout the second trimester of pregnancy, this pose can relieve backaches, but it is also therapeutic for flat feet, Carpal Tunnel Syndrome, osteoporosis, Sciatica, and infertility.

Tree Pose - Vrksasana

yoga-poses-vrksasana

The Tree Pose should not be done if you have a headache or insomnia.

You also shouldn't do it if you have low blood pressure but you can do it if you have high blood pressure, just don't raise your arms over your head.

This pose strengthens the legs and the spine while also stretching the inner thighs and groins, shoulders and chest.

Because this pose is done on one foot, you will see an improved sense of balance over time. It is therapeutic for flat feet and Sciatica.

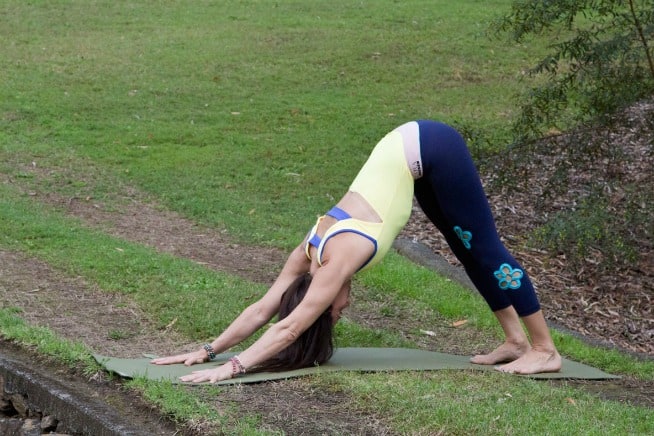
Downward Facing Dog - Adho Mukha Svanasana

beginner-yoga-poses-adho-mukha-svanasana

If you have Carpal Tunnel Syndrome or have diarrhea, do not practice this pose.

If you are pregnant, you can practice Downward Facing Dog up until you are considered late term, or it becomes uncomfortable for you, whichever comes first.

If you have a headache or have high blood pressure, you should support your head on something placed between the arms.

This pose helps to energize the body and calms the brain so it can help to relieve stress and depression.

It stretches the hands, arches and calves, hamstrings and shoulders, plus it strengthens the legs and arms which is great for toning those muscles.

The Downward Facing Dog helps to relieve symptoms of menopause, and when the head is supported as described above, it can relieve menstrual cramps.

It helps to prevent osteoporosis, or the worsening of it if it has already started, and it aides in digestion.

This pose is therapeutic for sinusitis, flat feet, high blood pressure, Sciatica, fatigue, insomnia, back pain, and headache.

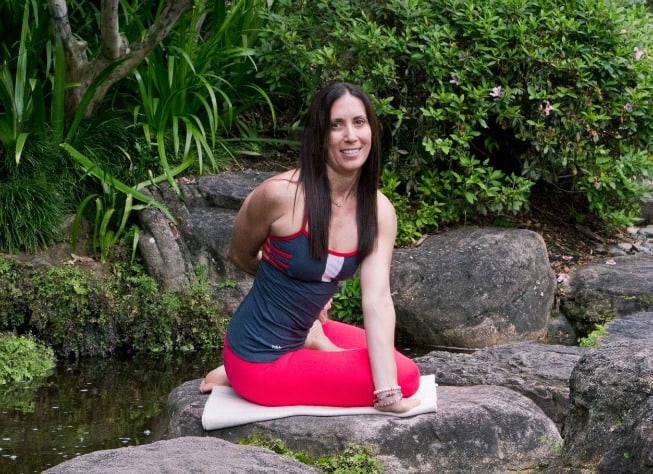
Half Lord of the Fishes Pose - Ardha Matsyendrasana

beginner-yoga-poses-ardha-matsyendrasana

If you have a spine or back injury of some sort, only practice this pose with the help of an experienced yoga instructor.

This pose stimulates digestion, the liver, and the kidneys.

It also helps to get things moving with the spine so it doesn't stiffen.

When performing this pose you will stretch the neck, hips, and shoulders. Therapeutic uses for Half Lord of the Fishes Pose include relieving menstrual cramps, Sciatica, backaches, fatigue, infertility, and asthma.

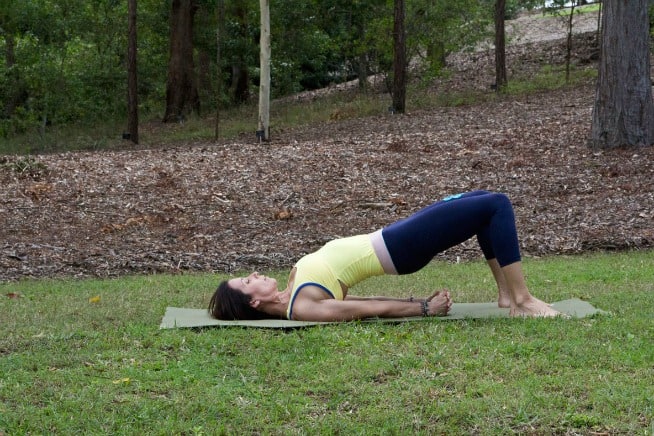
Bridge Pose - Setu Bandha Sarvangasana

yoga-poses-setu-bandha-sarvangasana

If you have a neck injury, make sure you have an experienced yoga instructor present.

This pose stretches the spine, neck, and chest while also stimulating the thyroid, lungs and abdominal organs which can lead to improved digestion.

Bridge Pose can aide in mindfulness which helps especially with mild depression and stress.

If you have tired legs, are going through menopause, menstrual discomfort, insomnia, headache or backache, anxiety or fatigue, sinusitis or asmtha, osteoporosis, or even high blood pressure this pose can help.

Four Limbed Staff - Chaturanga

beginner-yoga-poses-chaturanga

Be careful with the Four Limbed Staff Pose if you have a wrist or shoulder injury.

This yoga pose strengthens your wrists and arms, as well as your abdomen.

This is a great pose to practice in preparation for other poses where you will be balancing on your arms.

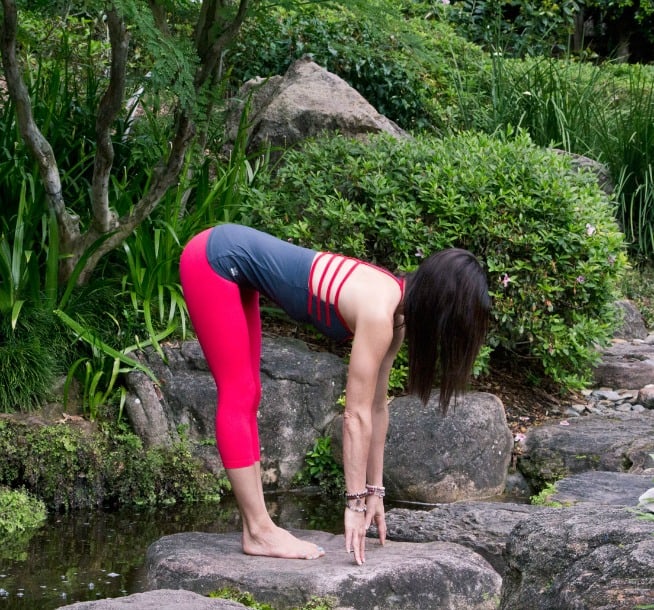
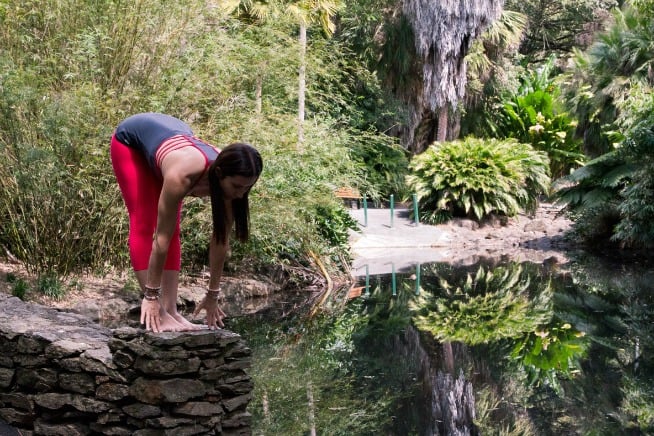
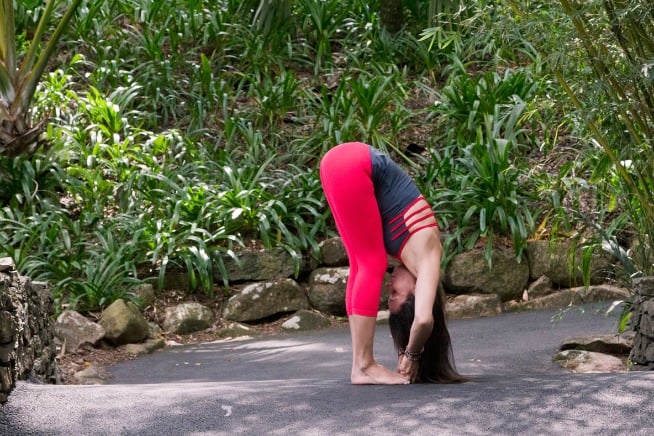
Standing Two-Legged Forward Bend - Standing Paschimottanasana

yoga-poses-standing-paschimottanasana

If you have a back injury only bend forward as much as is comfortable.

If you have a neck injury, be certain to keep your neck in a neutral position and don't look forward.

The benefits of this Forward Bend include stretching the backs of the legs as well as teaching patience and mindfulness.

Pigeon Pose Head Down - Adho Mukha Kapotasana

beginner-yoga-poses-adho-mukha-kapotasana

Because you will be folding one leg under your body, this should be done with the presence of a yoga instructor or with permission of a doctor If you have a hip or knee injury.

The Pigeon Pose opens the hips and stretches the fronts of the thighs.

This can be great for people who mostly sit during the day.

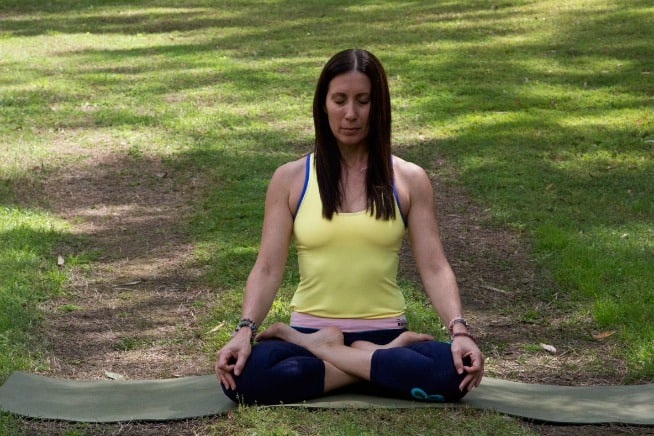
Lotus Pose - Padmasana

beginner-yoga-poses-padmasana

This pose opens the hips which is another great pose for those who sit much of the day.

However, this pose is mostly meant as one used for meditation and mindfulness.

Warrior III - Virabhadrasana III

beginner-yoga-poses-virabhadrasana-iii

This is another pose in which you will be standing on one foot so if you have any reason to believe your balance may be compromised, such as if you have low or high blood pressure, a lack of regular sleep, or a headache, then you should not practice this pose.

However, the Warrior III gives benefits of strength to the legs, core, and arms, as well balance over time, plus it helps you to focus.

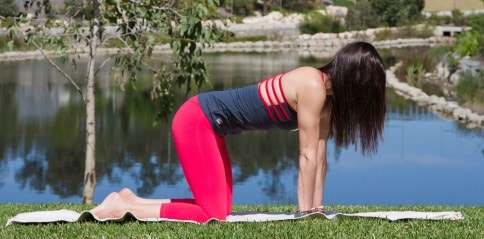
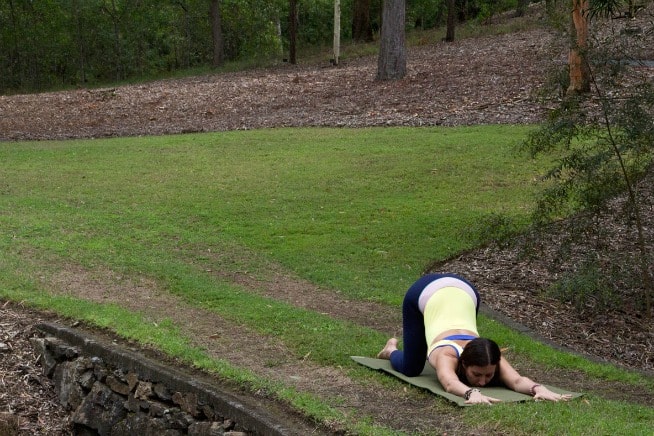
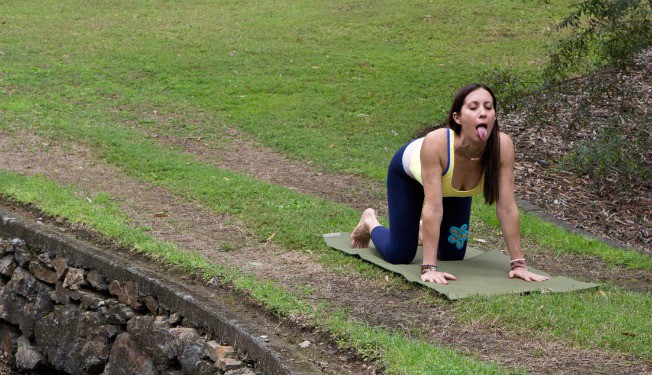
Cow Pose - Bitilasana

yoga-poses-bitilasana

Because this pose releases the muscles surrounding the spine, if you have a back injury, you may want to consult your doctor before practicing this pose.

However, this pose is great for relieving tension along the spine, helping with backaches and tension.

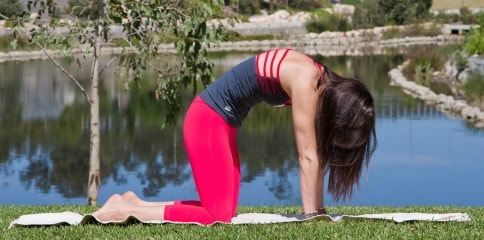
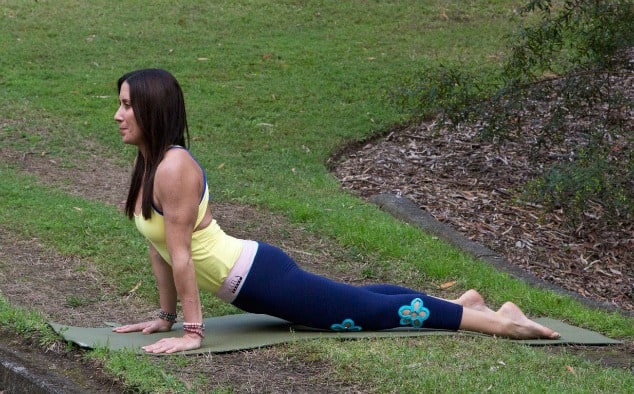
Upward Facing Dog - Urdhva Mukha Svanasana

beginner-yoga-poses-urdhva-mukha-svanasana

Upward Facing Dog shouldn't be done by anyone with a back injury as you are inverting the spine.

However, there are other yoga poses that can help you increase flexibility in your back so that you can get to the point of being able to practice this pose if your back allows it.

This is a chest opening pose so it can help with respiratory problems.

It also stimulates the abdominal organs and relaxes the spine.

Shoulder Stand - Salamba Sarvangasana

beginner-yoga-poses-viparita-karani

This is an inversion, so once again, if you have serious eye problems this shouldn't be done.

Also, your weight will be on your neck and shoulders, so if you have injuries or pain in those areas get clearance from your doctor.

However, this inversion is great for circulation which can be great for people who aren't as active as they should be or suffer from poor circulation.

It also opens up the back and the neck to help stretch those related muscles.

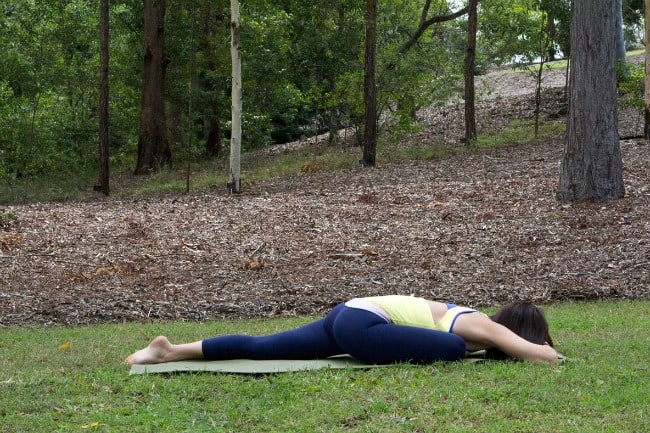
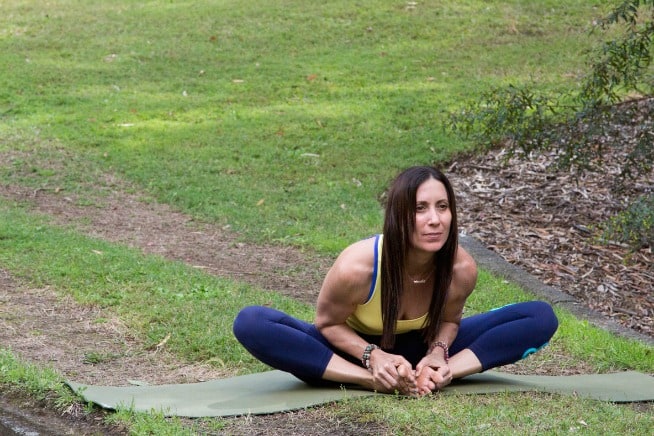
Butterfly Pose - Badhakonasana

yoga-poses-badhakonasana

Because you will be stretching your hips and lower back with this pose, only let your knees relax as far into the pose as is comfortable for your hips, and only lean forward as much as is comfortable for your back.

This pose is great for mindfulness and meditation sitting. As mentioned, it opens the hips which is great for people who sit much of the time.

Enjoy creating your own routine with these beginner yoga poses

Apart from the many physical benefits, yoga can be really relaxing and a great stress reliever.  

Apart from the many physical benefits, yoga can be really relaxing and a great stress reliever.

Click to Tweet

​There are lots of great yoga studios around, but perhaps you could try getting out in nature, doing some meditation and some of these easy yoga poses to relax.

Many thanks to our yogi Kerri McCubben for her help in taking me through these poses. That's her in all the images:)

Having studied in the spiritual home of yoga, India, and being a qualified raw yoga instructor Kerri ​is a great teacher.

You can follow Kerri on her web site for some great inspiration at Home Of Yoga New Farm

​I hope you have fun and enjoy pursuing yoga. 

Please feel free to share any other easy yoga poses which you enjoy, and think others might too, in the comments below.​

Chocolate Muffin Recipe

Chocolate Muffin


Chocolate Muffin Recipe for a special treat!

I love chocolate in any form, especially in cold weather when I want to have a cup of black coffee with something sweet to complement each other.

Dark chocolate is one of the best options, because it has different properties which help with your mood, contains antioxidants, antidepressant properties, etc.

For these reasons I decided to make my own chocolate muffin, gluten free and also with some protein for longer satisfaction and less cravings during the day.​

I like training, and eating, and I have to find the way that I can enjoy eating in a healthy way. So, a this recipe is great alternative to have at home, with your friends, take it with you for you morning or afternoon tea, and why not to prepare for a party to share with your guests.

Chocolate muffin is easy to make it please see below the recipe and share it with your friends.​

This recipe is to prepare six muffins.

Ingredients

  • 1 Cup of gluten free flour
  • 1/2 Cup of dark chocolate chips
  • 1/4 Cup of protein powder preferable chocolate
  • 2 Tablespoon of chocolate powder with no sugar add it
  • 1 1/2 Tablespoons of honey
  • 1/4 Cup of coconut oil
  • 1/2 Tablespoon of baking powder
  • 1 Egg
  • Pinch of salt
  • 1/3 Cup of water mixed with a 1/2 Tablespoon of instant coffee
Chocolate Muffin

Let’s prepare this delicious treat!

Turn the oven on to preheat at 170 centigrade.

In a bowl mix all the dry ingredients including the gluten free flour, protein powder, chocolate powder, baking powder and a pinch of salt. Mix all of them with a spoon or a whisk.

If your coconut oil is hard you can melt it in the microwave for 20 seconds. Then mix in a new bowl, the honey with the coconut oil until both of them are combined, add the egg and keep mixing it.​

Now, add the coconut oil mixture to the dry ingredients prepared before to combine them, then add the dark chocolate chips with the coffee (cold coffee) and mix well.​

Get the muffin tin and spray it with oil if you don’t want to use the muffin liners. This time I used muffin liners, because It is easy to take the finished muffins with me, when I go out.

With a spoon, get the mixture and fill up the muffin liners, or oiled baking tray to distribute for six muffins. Then place the tin in the oven and leave them to bake for around 15 minutes to be fully baked.

After the 15 minutes check one of the muffins with a little knife in the middle to be sure it is cooked. They knife should come out dry, without any sticky mixture on it.

If they’re done, take them out, prepare your black coffee or tea, and enjoy a delicious chocolate muffin for afternoon or morning tea.

I think that this will be a real great recipe, because of how popular muffins have become in the last few years for different events such as birthday parties, weddings, baby shower; etc.

One of the reasons is they look fantastic and attractive depending on the party theme.

Muffins make it easier for the guests and the host to get their own portion of the cake. This means no-one has to cut the cake and no-one has to wait!

If you decorated the muffins they will look very inviting for kids’ eyes, and will look great in photo’s.

In my case, I try to make them healthier and so I didn’t put any frosting on. Although I put the mixture in a beautiful muffin liner, and trust me they looked fantastic.​

I can host a party with clean eating recipes including the cakes!

Gluten Free Scones – Healthy Snack For You

Gluten Free Scones

Protein packed gluten free scones

Scones have been a popular snack to have with a cup of tea. Originally known as quick bread in Scotland, it became part of the afternoon tea tradition in England and extended to other countries.

Scones became popular when one afternoon Anna, the Duchess of Bedfords (1788-1861), servants brought some sweets and bread including scones, and she was delighted by them.

My mother in law lived in the country for long time, and as a country woman she used to cook everything to feed her family. Within her recipes were scones, which was like a tradition in her family.

My husband told me how much he enjoyed having scones with black tea with his dad in a winter afternoon, while they were working on the cattle station.

These were nice memories for my hubby from his time growing in the bush. Mums usually know their kids who-ever they are, and my mother in law is not an exception so she wrote a scone recipe for her son to prepare.

I enjoy so much asking people for different recipes, and I organised all the recipes from my mother in law and kept them in a safe place. The reason I like them so much is that everything looks so easy to make including great baking recipes, and scones are not an exception.​

This afternoon there was a really cold snap here, and I cooked some gluten free scones to have with my husband for an afternoon tea treat.​

I made the scones lactose free, as I am intolerance to gluten and lactose, so I followed the original recipe, but I did a few changes to suit my diet and healthy lifestyle.

We really enjoyed the gluten free scones and I want you have a healthy snack for cold weather or for any day really. Gluten free scones recipe is easy and quick to make.

I hope you like it as well.

Gluten Free Scone Recipe

Ingredients:

  • 2 Cups of gluten free flour
  • 1/2 Tsp of bicarbonate of soda
  • 1/2 Tsp of baking powder
  • ¾ Lactose free ticked cream
  • 1 Tsp of organic honey (optional)
  • ¼Lactose free milk
  • Pinch of salt
Healthy Snack

The first step is to put your favourite music on, before you start to bake the gluten free scones, that way it’s really relaxing to cook.

Then preheat the oven at 150 degrees.

In a bowl, mix the gluten free flour, protein powder, bicarbonate of soda, baking powder and pinch of salt. I mixed with my wooden spoon that my father made for me.

In a separate bowl, put the thickened cream, coconut oil and the honey, and with the mixer combined them until they all become one texture.

Put the dry ingredients into the mixture and mix slowly until it becomes a dough. If you find it very dry, add the lactose free milk to moisturize the dough to the point than the dough doesn’t stick in the mixture and becomes easy to work with.

Get a baking tray and spray it with olive oil or cover it with baking paper. I usually do the last option, as I like cooking with as little oil as possible.

Then get the dough, put it on the bench (I through some flour on the bench before hand to prevent the dough sticking on the bench) and roll the dough to get a measure of two centimetres thick.

To get the shape of the gluten free scones I got a glass and greased it around the rim with coconut oil to make easy get every scone. Just push it into the rolled mixture, to cut out each scone.

Tip: When you put the glass into the dough, don’t twist it around. The reason for this is, it makes the gluten free scone mixture tough when cooked. Just put the glass into the dough to get the shape and place the scones on the tray.

Now, we have all the gluten free scone’s cut, put all of the them on the tray, with one and a half centimetre’s between each scone, and place the tray into the oven for 10 mins at 150 degrees. Then turn the oven to 100 degrees, and leave the scones baking for 10 more minutes.

I usually check one of the scones with a knife before taking them out of the oven to be sure if they are cooked properly.

And finally, get your gluten free scone, cut it in the middle put a spoon of honey and thickened cream, and enjoy them with a cup of tea or coffee.

I have them with cup of ginger tea.

I hope you enjoy cooking gluten free scones with protein and sharing them with your family or friends, or why not with yourself and the music?

For another easy to cook, healthy snack, check out my gluten free banana cake recipe

Gluten Free Banana Cake Recipe

Gluten Free Banana Cake Recipe

Easy to make gluten free banana cake recipe

What inspired me to come up with a Gluten Free Banana Cake Recipe?

Well, I went to the markets with my hubby, and we bought a big box of bananas for a great price, as my husband loves them and the price was just so great, he decided to get the whole box.

Then I had to work out how we were going to eat them all before they went off.

I often follow recipes from my family, books or the internet. I decided this time to create my own gluten free banana cake recipe, with the healthy ingredients, to surprise my hubby for his birthday.

And it’s even better to be able to have this banana cake as a healthy snack without getting sick or feeling guilty for this treat.

Bananas have a lot of benefits. They are rich in potassium, B6, help to combat depression, etc.

Also, bananas are a great fruit for sports people, because it helps to recover the electrolytes, and prevent cramps.

In addition bananas are easy to find all year round, and anyone can eat easily.

OK, now, I’ll share with you all, my amazing gluten free banana cake recipe.

Banana Cake Ingredients:      

  • 6 Medium ripe bananas
  • 4 Eggs
  • 1 Cup of almond meal
  • 1/4 Cup husk psyllium
  • 1/4 Cup poppy seed
  • 1/4 Cup sesame seed toasted previously
  • 1/4 Cup flax seed toasted prevously
  • 3/4 Cup of protein vanilla powder
  • 1/4 Cup of peanuts or any nuts
  • 1/2 Cup of honey or malt
  • 3/4 Cup of coconut oil
  • 1/4 Cup unsweet almond milk
  • 1 Teaspoon of cinnamon
  • 1 Teaspoon of nutmeg
  • 1 Teaspoon of bicarbonate of soda
  • 1 Teaspoon of baking powder
  • Preheat the oven at 175O before you start to prepare your delicious gluten free banana cake!

    Put 4 bananas into the blender with all the eggs and the flax seed (that have been toasted in a pan previously without any oil and at low temperature) blend these three ingredients until you get a smoothie.

    Put the smoothie into a bowl and add the coconut oil and mix them with the mix master.

    Then add the honey or maple syrup and keep mixing until the honey and the coconut oil have been combined with the smoothie.

    In a separate bowl, mix the almond meal, husk psyllium, poppy seeds, sesame seed (toasted in a low heat in a pan without oil), protein vanilla powder, cinnamon, nutmeg, bicarbonate of soda and the baking powder.

    I mix all the ingredients with the wisk, although some people may prefer to use a wooden spoon.

    Gradually, mix the dry ingredients into the banana smoothie previously prepared. Just a bit at a time, and keep mixing with the mix master.

    Repeat the same process until all the ingredients have been combined, and then add the almond unsweet milk to moisturize the mixture.

    When all the ingredients are mixed put all the peanuts or the nuts that you want to use into the mix, I use peanuts and mix with the wooden spoon.

    The mixture is ready to put into a tin, measuring 20 cm by 20 cm.

    Take the other two bananas, cut them into slices and put one of them at the end of the tin. Then add the mixture and the other sliced banana. Put them in the top of the mixture and your gluten free banana mixture is ready to put into the oven.

    I bake the cake at 175 Degrees for 45 minutes, then I turn the temperature down to 150 and leave for one hour.

    I check the cake by inserting a knife in the middle to look it is ready. You will know it is cooked enough, when the knife comes out clean.

    Leave the cake to cool down, before putting it on the tray, and enjoy a gluten free banana cake!

    Banana Cake Recipe

    Some ideas about how we eat it are for breakfast, heated up with butter or as a dessert after dinner.

    This Gluten free banana cake lasts for just 5 days, so enjoy while it’s fresh.

    My hubby really loved this cake, and it’s so healthy, being full of natural ingredients, that I didn’t even feel guilty feeding it to him.

    This is a great recipe for a treat or dessert, although if you are looking for a main meal check out my 31 easy clean eating recipes.

    And I love it too. It’s so easy to make, really clean healthy eating. I should have called it my really lovely guilt free healthy cake!

    I hope that you try it, and I’d love you to leave me a note in the comments below, to let me know if you enjoyed it too?​

Progressive Overload – Principles Of Strength Training

Squat

According to Wikipedia, progressive overload is "the gradual increase of stress placed upon the body during exercise training. It was developed by Thomas Delorme, M.D. while he rehabilitated soldiers after World War II." Full description here

And, principles of strength training; "involve a manipulation of the number of repetitions (reps), sets, tempo, exercises and force to cause desired changes in strength, endurance or size by overloading of a group of muscles". Full description here 

Progressive Overload - And why should you care about this? 

​Well, if you don't understand how to achieve progressive overload, through applying effective principles of strength training, then you are likely wasting most of the time that you're spending working out.

Your body will not change unless you force it to change.  

it doesn't change voluntarily, just because you wish it to.

Simply put, you need to make your body be able to do something which it before could not do.

​Then, your body will adapt by becoming stronger and building muscle, to cope with the new stresses it believes that you need to cope with in life.  

Reverse this process, by being less active, and your body will believe that it needs less muscle and reduce the amount of muscle you have, making it easier for fat to build up from any excess energy / calories which you consume.

progressive overload fatty

​Lots of people go to the gym five or more times a week, for an hour or more, but over the years their body doesn't really change much at all.  They are simply doing just enough training (application of stress to the body / muscles) to maintain their current physique.

If you are happy to just maintain your current physique, there is no problem with that, assuming you are in reasonable shape, but;

It might give you more free time to spend doing other things, if you understand how ensuring that you are applying progressive overload could achieve this result in fare less time.

two good quality training sessions per week, would normally be more than enough to achieve maintenance, presuming that you also have reasonable eating habits / nutrition planning.

​When you understand, and focus on achieving progressive overload, you can be sure that you are training properly, and can be sure of achieving results.

​If you're not doing that, then it's likely that at best you aren't achieving the results which you could be, and it's highly likely that you're not getting much result at all.

​So, if not doing this, pretty much guarantees you at best poor results, why isn't every one focused on achieving progressive overload with their training?  Well;

  • It involves effort, lots of people don't really like effort, and;
  • Most average trainers don't properly show people how to do this. No, doing three sets of ten reps with a weight that's easy for you to handle isn't proper training.

​One of the biggest problems that you face in achieving progressive overload is, how do you continue to increase the load without hitting plateaus, where you just can't seem to break through and increase your one rep max?

 Even using periodisation programming where you alternate higher reps with higher weights can eventually get difficult to make significant progress with. 

The other problem that particularly new lifters can find, is that it can be overly challenging for them both mentally and physically, to handle heavy loads.  This can also be a problem if you are recovering from an injury.

​So, let's look at different ways that you can achieve progressive overload, in strength training.

Nine ways to achieve progressive overload;​

  • Increase weight;

When you are physically able to increase the weight you can lift for a given number of reps, it's time to go heavier.  Staying with the same weight will simply maintain your current body.

​Depending on which muscle group you are working with the exercise, and how advanced a trainer you are, will determine what a reasonable increase in weight is. 

When you are just starting, it is relatively easy to increase weight, as your body adapts quite quickly, to cope with what is probably not initially a truly heavy weight.  A more advanced lifter will already be handling heavier weights, and so a smaller incremental increase will be possible.​

If you are training legs, with something like squats or leg press, then an increase of 10kg may be easily handled, but clearly your biceps won't handle this.  You need to be practical and consistent.

If you need to work out what kind of weight you should be capable of lifting for a given repetition range, then this handy calculator will help you do this;

  • Increased repetitions;

Increase the number of reps that you do for each set.

This is often used in alternate cycles with the increase in weight noted above, as periodisation.  where you perform higher reps in one training session, followed by higher weight in the next session, and then back to higher reps for the next session, usually on a week to week rotation.

​If you were to simply continually increase the number of reps for each set, you would start to get an out of control rep range.  It's a good place to start for a beginner, followed by an increase in weight, and then alternated.

  • Increase sets;

Increase the number of sets you complete.

If you are already pushing yourself to complete the most number of reps that you can with a given weight, it's not practical to achieve more reps.

Instead, add more sets to your program.  Instead of completing three sets, add another one to two sets.  Even if you can't complete the same number of reps for these sets as you did in the first three, you are moving more load, and so increasing the stress / overload on your muscles.​

  • Increase amount of exercises;

Add extra exercises, for a particular muscle group, into your program. 

You might have pushed yourself to complete the most sets and reps of squats possible in the session.  But you will be able to complete some extra sets of leg curls and leg extensions, to increase the workload, and thus overload on these muscles.

You could find that if you are giving it your all during a squat session, this might work better if you complete the extra sets of leg extensions and curls, before doing the squat sets.  This will obviously make completing your squat sets more challenging, but your quads, glutes and hamstrings ​will be well warmed up.

  • Increase training frequency;

Increase the number of sessions you are training a muscle group for.

We need to remember that we are focusing on overload of muscle groups, not simply increasing the workload that the whole body completes.  Although that would also produce the result of making you fitter, provided you don't over train.

So, if you were training legs, including quads, hamstrings, and glutes twice a week, you could add a third session into your program, including the same exercises.

​Women typically have faster recovery time than men, and so will need less time between working a particular muscle group, to allow it to recover.  Definitely an advantage to being a woman!

If you are going to use this method, you should also focus on recovery for these muscle groups between sessions.  Depending what level of training you've reached, this could include, massage, ice baths, active recovery such as walking, cycling, some running, stretching, foam rolling etc, between your strength sessions to ensure the muscles are ready to handle more stress again.

  • Increased intensity;

Increase the intensity with which you complete your sets.

This could be done by increasing the speed with which you complete each repetition.

If you complete each rep with a faster tempo, working on speed and power, you are exerting more effort.  

If you force yourself to complete each rep at a slower tempo, the time under tension is increased, and greater effort is required to complete the same number of reps for each set.​

  • Decreased rest time;

Try halving the amount of rest time that you have between sets.

Often you will see people around the gym chatting and socializing b​e-tween sets.  They are probably in the "exercising" zone, instead of "training", as there is clearly little or no focus on a set rest time.

Some people have a different view on this, believing that you need to take as long as you need to between sets, to recover fully before completing the next set, so that you can complete each set with greatest effort.  There is some merit to this thinking as well, particularly if you are already lifting very heavy weights​, or high reps.  But what every your recovery time, it should be spent breathing well to recover, and focusing mentally on the next set, not idly chatting. 

​Allocate your time in the gym for training, focus on that, to get results, and enjoy socializing after the works been done.

  • Change the exercise;

Change the exercise that you are using to focus on a particular muscle group.

For example if you have been doing body weight squats, you could do jump / plyometric squats instead.

​You could add something like this into your program as well.  Complete body weight or jump squats, or flying lunges between your bar bell squat sets.  Your legs will be dying after this workout, but the gains will be rewarding in time.

  • Shocking principle;

Add any of the following into how you complete your sets.

  • partial reps
  • drop sets
  • cheat reps
  • slow negatives
  • static contractions

Even just adding something like completing a few extra partial reps at the end of each set, is adding additional progressive overload to the muscle.  

​Try adding a different shocking principle technique to the end of every set, and really feel the burn! i.e;

  • Set 1 - 12 reps + 5 partial reps
  • Set 2 - 12 reps + hold for 30 seconds static contraction
  • set 3 - 12 reps + 5 slow negative reps

​With this knowledge, applied with the right amount of effort, you can't help but achieve gainz!

progressive overload - deadlift

​Progressive overload, applied to principles of strength training;

​We need to remember that progressive overload is only one principle of strength training, albeit a foundational one.

​If you were to blindly pursue this principle, without correct application of others, your training will still suffer.  So let's tie a few other strength training principles together.

  • Ground based activities

most sports, and in fact most things we do in life require force applied through your feet to the ground.  To move you in any direction, laterally or vertically standing up or jumping.

The more force you are able to apply through your feet, the better you will be able to perform.​

​so, training with exercises that include these moves, and require you to exert force through your feet is practical and provides bang for your buck, training wise.

​Exercises such as squat, dead lift, cleans, lunges and a range of plyometric moves are great for this.

  • Train with explosive force

​The more explosive force that is involved in a movement, the more motor units within the body, and the muscle fibers which they control and engaged. 

Again, plyometric moves, and major lifts such as the squat, deadlift and cleans will require explosive force to complete properly.  

The more explosive force which you apply to these moves, the heavier the weight you will be able to move​, and therefor better results are achieved during, and after, training. 

Remember that training with weights, is "all about the weight" and usually you should be aiming to train with a heavy load.  So even when applying explosive force, you won't be going too fast, or swinging the weights.  They will be too heavy for that, so if you find yourself doing this, stop and evaluate what you are doing, because it's wrong.

And if you are wondering how your strength compares to other lifters.  Well, I could tell you that we are all unique individuals, and so focus on your own performance, but that's just weak!

And I know that we all love some competition, so I'll share with you this strength level calculator, which I think is great to gauge yourself.​

And just in case you're wondering.  It rates me as advanced, and says that I'm stronger than 92% of women in my age group.  So considering that I'm not a power lifter, I'm pretty happy with that:)

And, if I continue to apply the progressive overload principle in my programs, then one day they might rate me as elite - Can't wait!​

  • Compound lifts, using multiple joints

​There aren't too many things that we do in life, that don't require multiple joint movements.  So training this way as well, is just good sense.  And you'll get better results, so why not do it:)

​These exercises again include squats, deadlifts, lunges, cleans, pull ups and plyometric moves.  All of which engage more total muscle fibers than isolation exercises such as bicep curls, tricep extensions etc.

It should be pretty clear, why the compound moves are foundational in most good training programs.  I just love them!

progressive overload strength training principles
Progressive overload pullups
  • Periodisation in strength training programming

​I touched on this above, when considering how to continually achieve progressive overload. 

There are a couple of important points;

  1. You can't train at 100% maximum effort for 12 months every year, or your body will not have sufficient rest and recovery.  
  2. It is extremely difficult to simply continue to increase the weight you are lifting, each and every training session.  

Therefore, most strength training programs will have an element of periodisation built into them.

​This can be, increasing the reps one week, followed by increasing the weight the next week.   splitting different body parts like upper and lower into different sessions, on season versus off season training for professional athletes, or a combination of these type of things. 

  • Training your different energy systems

​Depending on what sport, or other purpose you are training for, there will be a different focus to achieve the required result.

​The three main energy systems are;

  1. Anaerobic lactic system​ - generates force for medium intervals
  2. Anaerobic alactic system - generates maximum force for a short interval
  3. Aerobic system - moderate force for a long period.  Long distance running and the like

There is an element of progressive overload required to achieve results from most forms of training, but we have been mainly focused on strength training here, which when done properly will train the Anaerobic systems mainly.

​I hope that this will help you to be focused on the right things when you are training.  Most of all, focus on training, not just "working out".  

You need to have goals, measure your current performance, set proper programs to continually improve that performance, and your results will be unstoppable!​

And while we're talking about setting proper programs and measuring performance, make sure that your diet is optimised to help your body recover and perform as well.  I've written another post, about how to formulate your own sports nutrition plan, which can help you with that.

Please feel free to share this with anyone you know who needs some help shifting up from just "working out" to getting real results.  

One Rep Max Calculator

one rep max bench press

One Rep Max Calculator - Measure Your Progress

To prepare accurate strength training programs, you need to measure your current strength. 

Use this simple one rep max calculator to estimate your current strength.

Just do the following; 

  • complete a set to absolute failure, enter the weight lifted and click calculate
  • Find the number of reps you completed in the Reps column
  • The figure in the One-RM column is your estimated one rep max for this exercise
  • The figure in the Percentage column is the % of your one rep max that the weight you used for your set equals.

Push Your Max!

**Before completing any exercise activity, you should check any health concerns with an independent medical expert, and obtain their approval.

ONE-REP MAX (ONE-RM) CALCULATOR
Reps Percentage One-RM

This is an estimate, as your true one rep max could be slightly higher or lower. (We hope it's higher) 

Just as if you worked your way up to an actual one rep maximum lift, depending on how you're feeling, and performing, on the day, you may be physically capable of achieving a higher weight, with optimal mental and physical performance.  With using this method of completing a set to absolute failure, your calculated results can vary in accuracy depending on how hard you push yourself to achieve actual absolute failure

If you stop your set, just because you started feeling tired, or it was getting a bit hard, you've done 12 reps and you usually only do sets of 10 so you feel that's enough etc, then you have not pushed yourself to achieve an accurate measure of your current strength. 

​Absolute failure means just that. You keep completing reps, until it becomes physically impossible for you to complete another full repetition. 

Using this one rep max calculator is a safer way for many people to arrive at a measure of their current maximum strength, than if they actually attempt a true one rep maximum lift, which obviously places maximum strain on your body to achieve the same result. 

Using One Rep Max Strength Test in Effective Strength Programming

Of course you can use this calculator to establish your one rep max for any lifting exercise, but whole body movements such as the following exercises are most useful in designing proper strength training programs, and measuring strength gains. 

Squat;

Dead-lift;

Bench Press;

one rep max calculator bench press

As you progress with your strength training, you should always be aiming for progressive overload, so that your body will continue to adapt to the new conditions it needs to deal with. 

If you're interested in finding out more about effective strength training, you should check out my blog on progressive overload. It's one of the best things you can do to get impressive results.

Your body is an amazing gift, that will adapt and improve, if you continue to challenge it. So always aim for progress over perfection, and your body will reward you.

I hope that you find this calculator a useful tool, that will help you with your training.  Let me know in the comments below, if you're achieving new 1-RM's!

Strength Training Workouts Positive For Women

strength training workouts

When thinking about strength training workouts, the first picture that used to come to mind is a sweaty man working out in a gym. Thank goodness that stereotype has been long since buried for most of us.

Strength training workouts sculpt your perfect body;

The fact is that both men and women can gain positive benefits when engaging in this type of physical exercise.

Research demonstrates that strength training should be included in every workout program, but it is especially important for women who want to stay fit and healthy.

Some misconceptions still exist about how beneficial strength training can be for women, or whether they should be “doing it differently” to men. Just a few years ago, women would never have considered “lifting heavy”, but now it has become extremely popular.

Old beliefs have given way to new ones, as women become more determined to live longer, healthier and more active lives, and sports science catches up to help them train more effectively.

If you do happen to harbour any doubts, the following benefits should convince you to start lifting heavy as part of your routine.

Strength training workouts, heart health benefits

The heart is a muscle too that is sometimes neglected before it is too late.

Strength training workouts help the heart by reducing the risk of cardiovascular disease in women.

Exercise contributes to an overall healthy heart by helping to decrease LDL levels, also known as "bad" cholesterol. HDL cholesterol levels in the blood "good" cholesterol is increased leading to a healthier heart.

High blood pressure may be reduced by following a program of strength training. Just as the heart benefits from strength training, so do the veins and arteries. When the heart walls are thicker, pumping blood becomes a much more efficient process.

The American Heart Association says that;

A well-rounded strength-training program provides the following benefits:

  • Increased strength of bones, muscles and connective tissues (tendons and ligaments);
  • Lower risk of injury;
  • Increased muscle mass, which makes it easier for your body to burn calories and thus maintain a healthy weight
  • Better quality of life.

Note that in the following info graphic the AHA are recommending at least two high intensity muscle strengthening sessions per week;

strength training workouts health heart benefits

Strength training workouts, bone density benefits

Older women are especially susceptible to osteoporosis and bone loss. Even younger women are at risk for developing this disease because their bones are naturally lighter than men’s are.

strength training workouts bone health

Aging is a major factor in the decline of bone density and bone loss. Women can improve their chances of avoiding osteoporosis by building and strengthening their bone density through strength training.

Strength training exercises have the additional benefit of helping reduce the risk of falls or other accidents that can lead to fractures. 

Younger women who start training early have a better chance of making their bones stronger in later life.

Strength training workouts, controlling chronic conditions

Doctors recommend the correct type of strength training program to help their patients who suffer from chronic conditions.

They find that it is easier for them to manage this type of condition by adhering to carefully managed strength training workouts.

Several troublesome health conditions such as heart disease, back pain, diabetes, and obesity can be improved through strength training.

Noticeable improvement has been observed in patients suffering from arthritis. Even though some people believe that any exercise program is harmful for joints, the opposite is true.

Health care professionals recommend strength training for their patients with debilitating rheumatoid arthritis.

Even though this training is often prescribed for joint tissue rehabilitation, it is important that if you are suffering from problem joints, you get approval from a physician before beginning a program.

strength training workouts bone fracture

Strength training workouts, managing weight

Weight management can be a concern for women and can easily be addressed in a strength-building regime.

strength training workouts, weight loss

You can see in the above graph, that even only a modest increase in overall strength over a ten month period, resulted in significantly reduced body weight.

Consistent strength training will improve the body's capacity to burn calories, and over time, a more efficient body becomes a fat burning machine

Building muscle mass helps women burn extra calories, even when not actively engaged in a workout. Both strength training and cardio training help in weight reduction. One is not as effective without the other.

Cardio is designed to burn calories thus reducing fat, while strength-training programs concentrate on toning and firming the muscles, while also burning a high amount of calories.

Studies show that the body continues to burn calories at a higher rate for longer, following heavy strength training, than it does following a steady cardio session. Therefore, strength training really does give you more bang for your buck, on the time you’ve got to exercise.

Strenth training workouts, feel stronger and less fatigued

A major benefit associated with strength training for women is how it helps improve stamina required for participating in everyday activities.

strength training workouts, healthy life

The added strength gained from weight training provides more endurance by building strength and increasing energy levels. Feeling strong and healthy physically provides a woman with confidence in going about everyday activities.

Another of the positive effects of strength training is that the physical fatigue enables a women to get a better night's sleep.

So when you're burning loads of calories from your workouts every day, and getting good quality rest at night, it results in that healthy youthful glow that just screams to the world that you are loving life.

You'll be slimmer, but stronger, so every day life will be easier and you'll not only look good, but feel great too.

Strength training workouts, controlling blood glucose levels

Type 2 diabetes is a risk at all stages of life, but is more prevalent as women age. Several studies have been conducted that illustrate that the addition of a strength training program can significantly improve blood glucose levels.

Type 2 Diabetes is caused by increased insulin sensitivity. Even though it can be controlled with medications and a healthy diet, strength training helps prevent it from developing.

A really quick but informative research article that explains this is - 

Strength training increases insulin mediated glucose uptake

Obesity is one of the factors believed to contribute to Type 2 diabetes and the tendency to be overweight is greatly reduced with a strength training program.

The American College of Sports Medicine guidelines recommend that strength training be included as an essential component of a well-balanced physical activity program for those with type 2 diabetes who do not have contraindications to exercise.

strength training workouts, push ups

Strength training workouts, improved overall fitness

A woman's body undergoes several changes with age. The natural loss of the estrogen hormone is responsible for the rapid loss of bone mineral density.

Younger women's bodies still produce this estrogen, which helps the body build new bone tissue. As the body ages and becomes more mature, the body loses its ability to build strong bones. Strength building exercise helps to combat the devastating effects of bone mineral loss.

Better muscle tone and improved strength through resistance training programs help improve balance and prevent the risk of serious injuries due to falls.

Improving your overall fitness, and your body shape through strength training will help you look better and feel great both physically and mentally.

Strength training workouts, improved Libido

Decreased libido can be caused by several factors that are commonly found in many individuals because of stress or just everyday living problems.

One of the positive effects of practicing strength training is increased libido. Men produce about ten times more testosterone than women do, but that doesn't mean that women don't also benefit from increased testosterone levels.

Because stress, boredom, and exhaustion can lead to a low libido, strength training helps reduce these factors, improving libido. 

If you're overweight, you aren't going to feel too great about yourself, and your self esteem suffers.  As your self esteem gets knocked around, reduced libido follows.  Strength training over a consistent period will help you to look great, and that naturally leads to feeling better about yourself, and more attractive.

Strength training workouts, relieves stress and mental fatigue

Strength training helps promote brain growth and reduces anxiety within the brain.

Because anxiety is caused by muscle tension, the physical stress of strength training helps reduce it. During a workout, the neurotransmitters in the brain function at a higher level and promote a more concentrated focus.

strength training workouts, cortisol

Stress causes the body to release cortisol, which can erode neurons and have a negative effect on memory and focus. Strength training decreases the cortisol released during stress, helps calm the nerves, and offers peace of mind.

Any exercise program is beneficial in the battle to combat depression, but strength training is more effective in lessening a sad or depressed feeling over a longer period.

Strength training causes the body to release endorphin's, which are referred to as happy or feel good chemicals.

Strength training workouts, stimulates the brain

The aging process can have a negative effect on the brain and cognitive functioning.

The brain can benefit from strength training at any age.

It works by increasing the flow of blood throughout the brain thus stimulating brain activity.

Because blood carries oxygen and nutrients to the brain, it runs more smoothly and operates more efficiently.

Strengthening exercises also exercises the brain as well as body muscles. These exercises have the potential to help the brain retain more information and improve memory function.

An interesting scientific study found that even one instance of completing a resistance exercise can improve your memory. 

You see, there's no truth to the old "meat head" stigma attached to strength training.  We're actually all getting smarter by lifting more, science say's so!

Strength training workouts, contribute to a more positive body image

Just feeling healthy and stronger has a positive effect on mental health.

strength training workouts, squat

Feeling confident and happier is an unexpected benefit of a strength training regimen. People who spend time working out exhibit an improved self-image. And it's not just because they're spending more time watching themselves in the gym mirrors either:)

Being able to perform previously impossible tasks such as moving or lifting heavy items is a real ego booster. Feeling fit and being stronger is in itself a mood enhancer for a woman.

The feeling experienced from a strength training workout has been described as a heightening sense of euphoria. This in itself gives women a more positive outlook on life.

A good strength training program challenges women to make a commitment to improve their overall physique, health and well-being. Having and maintaining a positive body image requires dedication, but is well worth it in the end.

Not sure how to start, strength training workouts?

So it's great if you've been reading this to get some affirmation that what you're already doing is really really good for you, kudos to you.  

But if you've always been a bit timid about venturing into the lifting area in the gym, you know, where the big boys hang out, then maybe you're not sure where to start. 

A great place to start is with these five strength training exercises

strength training workouts moves

And for more inspiration and ideas to include in your strength training, we recommend the following;

The ultimate female training guide, by simply shredded.

Still need more inspiration?

Just in case you've still got doubts, and think that strength training isn't for you, I'll share a couple of my favorite trainers, who I find really inspiring, and see if you don't like what strength training has done for them;

andreia brazier

Andreia Brazier, the Brazilian goddess and four times WBFF champion

Yes, I love her because she's Latina and has done so well internationally.

Andreia has become an inspiration for many women, and she shows different sides to being a fitness model, as you will find many images where she's not in contest shape.

She's not scared to show that even top fitness models don't walk around every day looking completely cut.

With a really healthy outlook, Andreia is really a great example of what living clean, and lifting iron can do.

Sophie Guidolin, the Australian fitness model and mother of four.

I met Sophie at an INBA competition here in Brisbane.  She was there with her husband, coaching some of the competitors, and had her kids in tow

You can read Sopie's bio on her site, to here it directly from her, how she was originally not into weight training, but it was only after she tried it, that she started getting really great results.

Sophie is a great example of a woman who copes with all the pressures of being a mum, but still maintains her healthy lifestyle.

Check out her site for some great recipe and training guides.

Sophie Guidolin

For myself personally, I just love running, but the best results that I achieve come from strength training workouts.

When I first attempted strength training, I really didn't challenge myself enough.  But lifting weights that you are comfortable with won't get you great results.

I learned that I was capable of lifting heavier weights, and to focus on progressive overload, and then the results started to happen.

I'm not intimidated by strength training at all anymore, I just love it.  

I can't encourage you enough, to focus on strength training workouts as a major part of your fitness program.  It will change your body, and improve your life!

Quick Healthy Pizza Recipes For Busy Women

pizza recipes

Every night when I arrive at home after a long day at work I just want to have a healthy meal for dinner, without too many calories. Although at the end of the week I am starting to get tired and just want to prepare an easy meal that doesn’t take a lot of time and effort..

I’m guessing you probably feel the same some days.

It is why I want to share with you this healthy pizza recipe, as I know at the end of the week our families want to enjoy a healthy pizza without worrying about calories.

Healthy Pizza Recipe

Pizza ingredients;

  • 1 Wholemeal Lebanese Bread
  • ½ Cup of Mozarella Full Cream Cheese
  • 1 Tomato cut in small pieces
  • ½ Cup of onion cut in small pieces
  • ½ Cup of Capsicum cut is small pieces
  • 1 Cup of Turkey, Chicken or Beef mince already cooked
  • 1 Spoon of Bolognese Sauce.
pizza recipe ingredients

pizza ingredients

After we have of the ingredients for our healthy pizza we are ready to start cooking.

Firstly, I cook the mincemeat in the pan with a spoon of coconut oil until it is browned. You can let the meat cook while you are cutting up the veggies, just to minimize the preparation time.

At the same time the meat starts cooking, turn the oven on to 150 Centigrade to pre-heat the oven.

Then, we spread the Bolognese sauce over the wholemeal bread, and then spread the tomatoes, onion and capsicum. Add the cooked mincemeat, and finally sprinkle the mozzarella cheese on top.

Your healthy pizza is ready to put into the oven to cook for around 10 minutes, until the cheese is melted and slightly browned. Keep an eye on it while cooking, to make sure it’s not overdone.

Your healthy Pizza meal is done, remove, cut into pieces and serve. Bon Appetite.

If you want to stay with the healthy pizza base, but experiment with different toppings to add some variety, that’s really easy. Just chop up and add some of your favourite foods as a topping ingredient. For some extra inspiration with this, take a look at these suggestions nine gourmet pizza toppings

I like this recipe without much sauce, but if you like more a more saucy pizza, then don’t use the spoon of bolognese sauce, and try this pizza sauce recipe instead. It’s really tasty, and you can make up a large container of sauce beforehand, to keep ready for when you’re cooking pizza, so it is still really easy to throw together a quick but healthy meal.

That’s my favourite because it’s so easy to prepare, healthy and tasty, so it ticks all my boxes. If you try this and would like to try some other different pizza recipes, then take a look at some of the following recipes that I’ve enjoyed as well;

 Try These Pizza Recipes

Gluten Free Mini Pizza; This is a really good option for you if, like me, you're gluten intolerant, and need to control how much of it you eat.   

Add all your own choice of toppings, to keep it really healthy or cheat a little and add some extra treats that you can burn off later. 

Grain free gluten free pizza; Completely guiltless pizza is hard to imagine, but this is surely it! 

Made entirely from vegetables, including a cauliflower base, and just 600 calories in a whole pizza, this tasty recipe is truly guilt free.

Gluten free quinoa pizza treat; Yet another gluten free option, easy on the stomach, but packed full of great tasting goodness.

Quinoa is one of my favourite super foods, and the recipe for this savory snack is just so quick and easy.  

For more recipes using the high protein quinoa super food, try these three recipes.

Gluten free chicken tandoori; The chicken breast provides a really nice protein boost to this recipe.  Add as much as you like, for a really filling meal. 

You can see how easy it is to get creative with healthy pizza recipes, just mixing and matching any of your favourite healthy foods on a healthy base.  Make your pizza as big and filling, or just a small snack depending on what you're feeling like. 

You really can enjoy your food, and stay in great shape as well.  It's not as hard as it's sometimes made out to be.  Just make some smart choices!

Stay healthy, love your life, and bon apatite.

Ab Workouts For Women Who Deserve Flat Abs

abs training

Do These Ab Workouts For Women Anywhere

Ab workouts for women who deserve flat abs?  Don't we all?

​Well, if you spend most of your free time just lying around, you don't train, and feed yourself junk, then NO, you don't deserve flat abs, and you'll need to be very young, or genetically gifted to have them.

​Those who are prepared to have a little discipline, with their diet and training, and put some work into having them. You deserve flat abs, and it's really quite possible for you to get them, and to maintain them.

A flat and toned stomach radiates health and beauty. Unfortunately, it is one area that many women find difficult to conquer.

While a slender mid-section makes for a slimmer look overall, there are other practical benefits to maintaining a strong core. Importantly it helps to support and protect the lower back and stabilises you throughout most daily activity, including training.

In order to achieve a tight tummy, it is important to understand the basic makeup of the mid-section. The abdominal area is comprised of a group of muscles that work together to provide a strong foundation linking the upper body and the lower body. These muscles can be separated into a few general sections.

There are the obliques, which are a pair of muscles that run down the sides of the stomach area stretching from under the rib cage to the pubic area.

Then there are the muscles that run down the front of the stomach. These are the muscles referred to when talking about a ‘six-pack’ and can be broken down into the upper, middle and lower sections.

To achieve a flat stomach, each of these muscle groups must be challenged, but this doesn’t have to be gruelling or time-consuming. The best part of exercising the abdomen is that there is no equipment required. Done properly and regularly, the following ab workouts for women will tone and strengthen the core.

These are simple exercises that don't require any equipment, and can be done at home, in the gym, or even get outdoors in the park.  I've used a yoga mat in the park, as I really like to get outside in the fresh air to train sometimes.

Elbow to Knee Sit Ups

The elbow to knee sit up is an isolation exercise that targets the obliques. To perform, lie on the floor, bend the left knee so that the foot is flat on the floor and rest the right leg across the left knee. Keeping the shoulder blades on the floor, clasp the hands behind the head. From this position, pull the abdominal muscles in toward the spine, lift the left elbow off the floor and bring it to the right knee. At the top, squeeze the obliques, then keeping the abdominal muscles tight, slowly return to the starting position.

Repeat the movement for the desired repetitions then switch to the other side by crossing the left leg over the bent right knee and bringing the right elbow to the left knee.

For beginners, a set of ten repetitions on each side is an appropriate target. Gradually progress up to 20 reps on each side. Each set should be done two to three times. Movements should be done slowly, holding the proper form. For the more advanced, keep the spine straight upon lowering back down and stop about an inch from the floor. Start the next repetition from this position. In order to avoid injury do not use rocking motions to lift the body up. If it is not possible to bring the elbow completely to the knee at first, bring it only to the point before it becomes difficult to hold the proper position.

Plank

The plank is not only a great exercise for the upper, middle and lower abdominals; it is great for the entire body. Start in a pushup position. Next bend the elbows and lower down shifting weight from the hands to the forearms. Pull the stomach into the spine to keep the body in a straight line. Do not let the hips drop or the rear rise. Hold for one minute. If this is not possible, hold for as long as possible, then take a five second rest and repeat until the time held in the position reaches a minute.

The plank is a strength move; the more it is done, the longer it will be possible to hold the position. Beginners may find it easier to drop the knees to the floor until the muscles have built up enough to hold the plank while resting only on the forearms and toes. Those more toned can make the plank more challenging by extending an arm and the opposite leg in the air. Hold for a set time, and then change sides.

Leg Raises With Hip Thrust

This exercise targets the lower and middle abdominals. Begin by lying on the floor with the hands resting along the sides of the body. Bend the knees and keep the feet raised about two inches off the floor. Slowly bring the knees up toward the chest, contracting the abdominals while raising the pelvis off the floor. Hold for a second, and then lower the pelvis and legs back to the starting position. The movements for this exercise should be done slowly and deliberately. Repeat for two to three sets of 15-30 repetitions resting for 60-90 seconds between sets.

Side-To-Side Heel Touches

The side-to-side heel touch is another exercise to target the obliques. Lie on the floor with knees bent, feet flat and hands placed at the sides. Pull the stomach muscles in toward the spine and raise the upper body about two inches off the floor. Reach the right hand along the side of the body to touch the right heel. Return to the middle then reach the left hand along the side of the body to touch the left heel. Repeat this motion staying focused on using the abdominal muscles to move the body rather than just reaching with the arms.

Beginners should focus more on form than on reps, but a good starting point to aim for is 2-3 sets of 8-10 reps. The more advanced can reach for a goal of 3-5 sets of 20-24 reps.

Side Plank With Raised Arm

Another exercise to work the obliques is the side plank with a raised arm. The easiest way to get into the side plank position is to start in the basic plank position with the body resting on the forearms and toes. From here, shift the weight to one side and turn the so that the front goes from facing the floor to facing the wall. At this point, the supporting arm under the body will also turn so that the fist faces the same wall as the stomach. The supporting shoulder should be stacked in a straight line above the elbow. The bottom of the body is supported on the sides of the feet as the abdominals hold the mid-section in a straight line. Raise the non-supporting hand straight up in the air and be careful not to let the hips sag toward the floor.

Hold the plank as long as possible, working up to a full minute. If this move proves to be too difficult to hold while balancing on the sides of the feet, bend the bottom leg and lower down to support the body on the side of the knee. Be careful to keep the body in a straight line and not use the knee only for support and not to lift.

Elbows To Knees

Also known as the ‘bicycle’ the elbows to knees works both the upper and lower abdominals. Lie on the floor with the hands behind the head supporting the neck. Pull the stomach muscles in toward the spine and lift the knees to a 90-degree angles. Twist bringing one elbow to meet the opposite knee as that knee if pulled further toward the chest. The opposite leg will straighten. From here, twist to the other side pulling the straight leg toward the chest and straightening the already bent leg, essentially making the legs mimic the motion made while riding a bicycle. It is important to keep the breath at a regular pace and to use to hands to support the head, not pull on it. It is not necessary that the elbows actually touch the knees as long as the twisting motion still occurs. Start with 6-10 reps and work up to 20 per set.

Leg Crossovers

Leg crossovers target the lower abdominals. To start, lie on the floor with the head cradled in the hands and legs stretched straight out. Pull the abdominals into the spine and lift the head and legs off the floor so that the stomach area forms a 45-degree angle. From this position, cross the right leg over the left as the left leg moves under the right. Uncross the legs then alternate to the other side. Repeat for 6-10 reps for 2-3 sets working up to 18-20 reps.

Raised Hips Hold

Better known as the ‘bridge’ the raised hips hold is a resistance move that is simple to perform and works the entire abdominal area. Lie on the floor with the knees bent. The feet should be hip-width apart and placed flat against the floor. The arms stay relaxed along the sides of the body. From here, lift the glutes by pushing off the floor with the heels bringing the body into a straight line from the knees to the shoulders. Hold for one to two seconds then slowly lower back down to the floor. Repeat this process, shooting for three sets of 15-20 reps.

While performing this move, be cautious not to push off the floor with the hands. For more of a challenge, raise the hands in the air then come into the raised hip hold position. This forces the body to better utilize the abdominal muscles in a more focused fashion.

During any exercise, especially these ab workouts for women, the most important thing to remember is that if there is pain it is time to stop. While regular abdominal exercise is crucial to have a flat and toned stomach, it is important to note that diet also plays a big part. Even rock hard abs can hide under layers of fat, so removing this fat is necessary to really be able to see the definitions these exercises will give the muscles. Eating a balanced diet of whole foods and healthy fats along with incorporating further strength training, particularly compound moves and select cardio exercises into the overall workout program will help to accomplish the goal of flat, strong and sexy abdominals.

The abs are one of the very few muscles in the body which will benefit from regular daily work, without rest days.  When strength training, most muscles need to be rested to achieve proper recovery, but the abs are used in a lot of the major compound exercises that you would be completing daily even in an upper and lower body split program.  The abs are resilient, recover faster and will cope with constant work.

​To get really strong, flat abs, they'll benefit from regular work, so try to spend some time on these ab workouts for women daily, or at least every second day.  I usually tag them onto the end of whatever daily training session I'm doing, prior to stretching. That way they become part of a progressive cool down.

Depending what kind of condition you are starting in, current body fat %, strength levels and diet, will largely dictate what other ​training and diet adjustments you might need to make, as well as following these ab workouts for women, to lose enough body fat for your abs to start showing through.  For most women, once you achieve around 15% body fat, you'll be really starting to see your abs, and have nice toned looking abdominals.

Strength training, focusing on large compound lifts, like these five strength training exercises and following a properly structured diet is a good path to travel if you need to make significant improvements in body composition, to get that ultimate flat abs look.​ 

Most of all, enjoy your training, and celebrate your progress!

Join The VIP CLub

Free Membership Saves 10% off all orders for life